If you need more help deciding which graphics card to buy, you can read up on all our graphics card recommendations for 1080p, 1440p and 4K gaming, and you can also find the best prices for them in our regularly updated graphics card deals hub. A few things to note before we get started. Your graphics card is one of the most powerful components inside your PC, so you’ll need to make sure you’ve got an appropriate PSU to match. Most graphics cards will state their minimum or recommended PSU wattage on the box or on their specifications page online, but it can vary from 450W all the way up to 750W. Nvidia’s new RTX 3070 GPU, for example, recommends a 650W power supply unit, while the RTX 3080 and RTX 3090 recommend you have one that’s at least 750W. You’ll also need to check your power supply has the correct number of cables to plug into your new graphics card. Some graphics cards only require a single 6 or 8-pin connector, for example, while others require two 8-pin connectors. Finally, make sure your display’s selection of outputs matches those on the back of your graphics card. New graphics cards tend to come with HDMI or DisplayPort outputs, so if you’ve been using an old monitor that only has a DVI or VGA output, for example, you might also need to think about upgrading your display in the process. If you need help with this, check out our top gaming monitor picks, as well as our gaming monitor deals hub for all the best prices.
How to install a graphics card
What to do next…
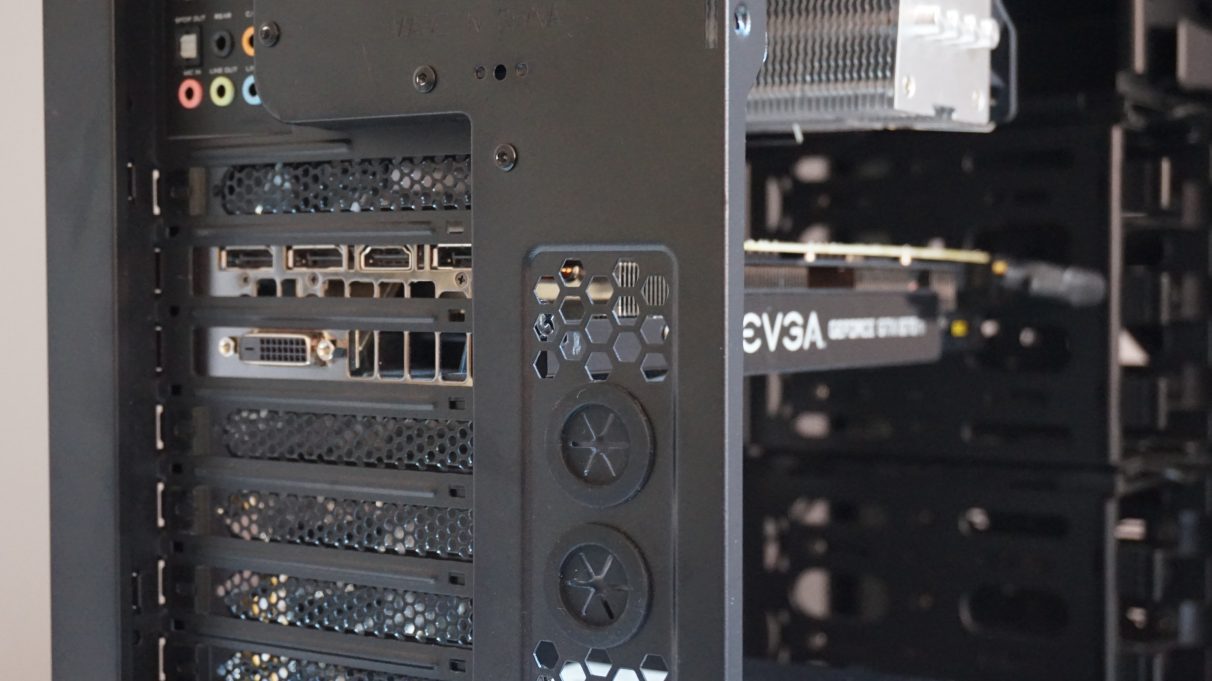
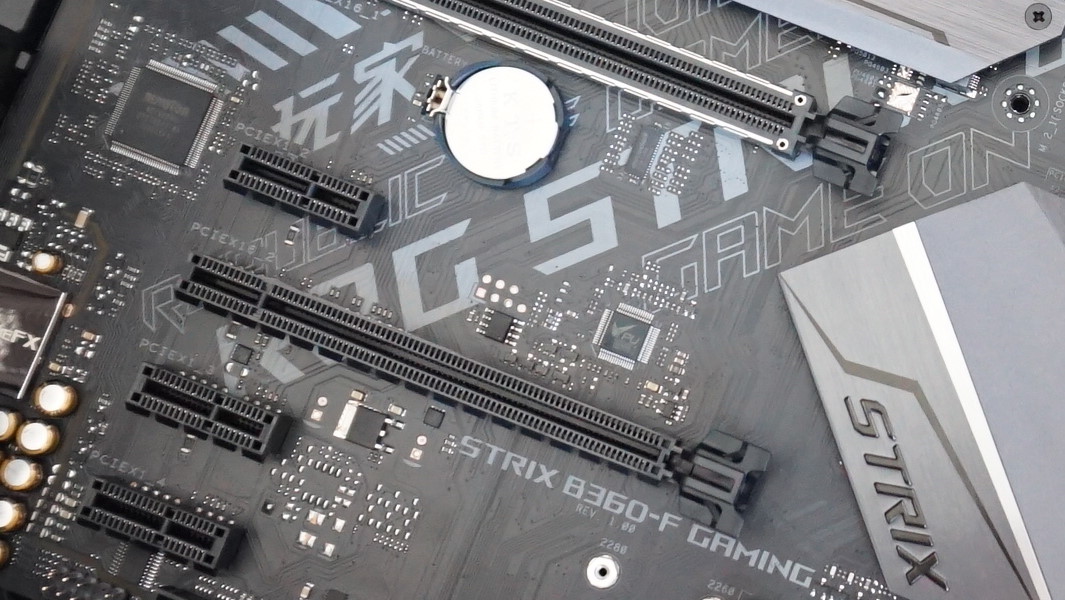
If you’re building a new PC from scratch, your next step will be installing your SSD / HDD. Next, remove the side panel. Start by untwisting the screws on the back of your PC, and sliding the side panel backwards. This should release it, allowing you to take it off, and put it to one side. If you’re installing a graphics card for the first time, carry on reading, but if you’re upgrading your existing graphics card, then you can skip down to Step 4. Now that you’ve removed your PC’s side panel, you should be looking at something like this: All graphics cards these days need to go in a PCIe x16 slot, which are the long, horizontal connectors on the lower half of your motherboard. Some motherboards may have a second PCIe x16 slot that can run at the full x16 speed - usually the more upmarket ones - but most of the time you’ll find any additional PCIe x16 slots you have only run at x8 speed, or even x4. As a result, it’s best to install your graphics card in the top PCIe x16 slot if possible. This will always be the fastest PCIe x16 slot on your motherboard, and will result in the best performance. If in doubt, consult your motherboard manual to find out the exact running speeds of all your PCIe slots. Before we do anything with the PCIe x16 slot, though, you need to remove the corresponding backplates. To the left of those PCIe x16 slots, you should see a number of brackets with thumb screws holding them in place. You’ll need to remove some of these so you can get to your graphics card’s display outputs. Most graphics cards take up two slots, but particularly large graphics cards, such as the enormous RTX 3090, take up three. Simply untwist the ones you need to get rid of using a screwdriver (or your fingers if they’re held on with thumbscrews). Make sure you keep those backplate screws nearby, though, as you’ll need them again in a minute to secure the graphics card in place. Remove any plastic covers on your graphics card’s PCIe connector and display ports, as these will prevent you from installing your graphics card correctly. If you’re upgrading an existing graphics card, you’ll also need to remove your current one. To do this, remove the screws holding it in place, disconnect any display cables attached to it, and unlock the PCIe slot security clip. This is a small plastic clip on the right hand side of the PCIe slot, and should just about be visible underneath your graphics card - see below. Then, you should be able to pull your graphics card away from your motherboard with relative ease. Next, line up your new graphics card over the top PCIe x16 slot inside your case. Make sure the display output side of your graphics card is facing toward the end of your case, and push your GPU down into the slot. If you can’t push it all the way in, check that there isn’t a stray backplate getting in the way. Otherwise, it should click into place in much the same way as your RAM, and sit straight along the PCIe slot. You might want to give it an extra shove, just to make sure. Once it’s firmly in place, the security clip should pop back up into its original position. Still got those backplate screws handy? Wherever you put them, dig them out again, as you’ll now need to use them to finish off securing the graphics card in place. Just put them back into the corresponding holes and twist. This will stop the graphics card from moving up and down when you come to connect your monitor cables, and generally keep it nice and steady inside your case. Now it’s time to connect your graphics card to your PC’s power supply. Most graphics cards need at least one 6 or 8-pin connector, but beefier cards sometimes require two - it all depends on the make and model. Either way, though, you should have the corresponding cables in your power supply box if you went with a modular PSU, or they might even be sticking out of it already if you went for a non-modular one. You’ll probably want to thread the connector through to the back of your case for this if you’ve got the space, routing it back round the main side using the appropriate hole down the side of your motherboard that’s closest to your graphics card’s power connector. This helps keep things nice and tidy and improves airflow inside your case, but you can always just plug it straight in if you prefer. Either way, these connectors are very similar to the main power cables on your motherboard - just push down and they should click into place by themselves. And you’re done! For those of you who are just upgrading your existing graphics card, though, you’ll want to make sure you follow these few extra steps. First of all, you’ll need to reattach your PC’s side panel and re-connect your display cables. Remember, make sure you plug them back in to the display outputs coming out of your graphics card, not the ones above from your motherboard. It sounds silly, but you’d be surprised how often people make this mistake. Once that’s done, you’ll need to turn on your PC and install some new display drivers.
Installing display drivers
To make sure your new graphics card is working in tip top condition, you’ll need to make sure it has the correct display drivers installed. If you’re upgrading from an existing Nvidia card to a new Nvidia card (or indeed from an old AMD card to a new AMD card), then all you need to do is download the latest drivers from their respective websites, which I’ll get to in a minute. If you’re upgrading from an Nvidia card to an AMD card (or vice-versa), however, you’ll need to remove your existing display drivers first so they don’t clash. AMD have detailed instructions on how to do this, but at time of writing Nvidia haven’t been quite as forthcoming about this. The good news is that it effectively boils down to the same method. To remove your current display drivers, open up Windows Settings and select Apps, or search for ‘Add Or Remove Programs’. For AMD, click uninstall AMD Software. For Nvidia, you’ll need to make sure you uninstall the Nvidia Graphics Driver, Nvidia GeForce Experience, Nvidia HD Audio driver, Nvidia PhysX System Software, Nvidia Control Panel and Nvidia USBC Driver if applicable. Once everything is removed, you may be prompted to restart your PC. Do this, and wait for the system to reboot. Don’t be alarmed if the resolution suddenly looks a bit funny. This is perfectly normal. Once you’re back at your desktop, use the links below to download and install the latest drivers.
Download the latest Nvidia drivers Download the latest AMD drivers
Once this process is complete, your desktop should have returned to its normal resolution, and you’re now ready to start playing games again.